Image To Array Tool

Hosted on github https://github.com/xitiomet/image-to-array
Simple Command line tool for converting images to data arrays. I made this to use with my RGB Shades (http://macetech.com/store/index.php?main_page=product_info&products_id=59), I wanted a simple way to convert any image into an array of pixels compatable with Arduino's FastLED Library.
As time has gone on features now include
- Converting images to base64 image strings and html
- Resizing images
- Finding all image urls in a text/html document and replacing them with base64 strings (also works with markdown!)
- Output 24-bit ASCII Art
- Replace color palette with nearest colors from another image
- Output 2 dimensional or 1 dimensional array for C/C++/Java
- Support for reading/writing WEBP images
- Create .ico files for windows (16x16,32x32,48x48,64x64,128x128 24bpp)
- Create .icns files for OSX (16x16,32x32,64x64,128x128,256x256,512x512 24bpp)
usage: ita
Image To Array: A tool for converting images to different forms of code
Project Page - https://openstatic.org/projects/imagetoarray/
 -?,--help                        Shows help
 -a,--output-ascii                Add a 24-bit ASCII art image to the
                                  output
 -b,--replace-urls                Replace all image urls in a text file
                                  with base64 images
 -c,--output-rgb-array <arg>      Add a RGB C/C++ struct array to the
                                  output
 -d,--details                     Add image details to output
 -e,--output-base64 <arg>         Add a base64 string to the output
                                  (argument is format JPEG,GIF,PNG,WEBP)
 -i,--input <arg>                 Input files or URLs
                                  (png,jpg,md,html,bmp,gif,txt,webp)
 -o,--output <arg>                Output a file instead of STDOUT
                                  (txt,html,md,png,bmp,gif,jpg,webp,ico,ic
                                  ns)
 -p,--input-palette <arg>         Input image file for color palette
                                  filter
 -r,--row-numbers                 Include row numbers on ASCII art
 -s,--scale <arg>                 Scale image (ex: 320x240 or 0.5)
 -t,--replace-tags                Replace all image tags in an html file
                                  with base64 images
 -x,--output-rgb-2d-array <arg>   Add a RGB two dimensional C/C++ struct
                                  array to the output
Example Usage
hearts.png (16x5 Image i want displayed on glasses)
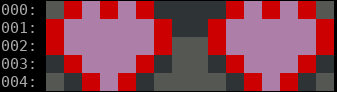
$ ita -i hearts.png -c CRGB
CRGB hearts[80] = { CRGB(102, 102, 102), CRGB(131, 24, 24), CRGB(255, 97, 239), CRGB(131, 24, 24), CRGB(255, 97, 239), CRGB(131, 24, 24), CRGB(0, 0, 0), CRGB(0, 0, 0), CRGB(0, 0, 0), CRGB(0, 0, 0), CRGB(131, 24, 24), CRGB(255, 97, 239), CRGB(131, 24, 24), CRGB(255, 97, 239), CRGB(131, 24, 24), CRGB(93, 93, 93), CRGB(131, 24, 24), CRGB(255, 97, 239), CRGB(255, 97, 239), CRGB(255, 97, 239), CRGB(255, 97, 239), CRGB(255, 97, 239), CRGB(131, 24, 24), CRGB(0, 0, 0), CRGB(0, 0, 0), CRGB(131, 24, 24), CRGB(255, 97, 239), CRGB(255, 97, 239), CRGB(255, 97, 239), CRGB(255, 97, 239), CRGB(255, 97, 239), CRGB(131, 24, 24), CRGB(131, 24, 24), CRGB(255, 97, 239), CRGB(255, 97, 239), CRGB(255, 97, 239), CRGB(255, 97, 239), CRGB(255, 97, 239), CRGB(131, 24, 24), CRGB(96, 96, 96), CRGB(96, 96, 96), CRGB(131, 24, 24), CRGB(255, 97, 239), CRGB(255, 97, 239), CRGB(255, 97, 239), CRGB(255, 97, 239), CRGB(255, 97, 239), CRGB(131, 24, 24), CRGB(0, 0, 0), CRGB(131, 24, 24), CRGB(254, 93, 225), CRGB(255, 97, 239), CRGB(255, 97, 239), CRGB(131, 24, 24), CRGB(0, 0, 0), CRGB(113, 113, 113), CRGB(113, 113, 113), CRGB(0, 0, 0), CRGB(131, 24, 24), CRGB(255, 97, 239), CRGB(255, 97, 239), CRGB(255, 97, 239), CRGB(131, 24, 24), CRGB(0, 0, 0), CRGB(93, 93, 93), CRGB(0, 0, 0), CRGB(131, 24, 24), CRGB(255, 97, 239), CRGB(131, 24, 24), CRGB(0, 0, 0), CRGB(104, 104, 104), CRGB(123, 123, 123), CRGB(123, 123, 123), CRGB(104, 104, 104), CRGB(0, 0, 0), CRGB(131, 24, 24), CRGB(255, 97, 239), CRGB(131, 24, 24), CRGB(0, 0, 0), CRGB(89, 89, 89) };
if you want to use a struct other then CRGB any value can be passed to -c for instance "-c MyStruct" would produce
$ ita -i hearts.png -c MyStruct
MyStruct hearts[80] = { MyStruct(102, 102, 102), MyStruct(131, 24, 24), MyStruct(255, 97, 239), MyStruct(131, 24, 24), MyStruct(255, 97, 239), MyStruct(131, 24, 24), MyStruct(0, 0, 0), MyStruct(0, 0, 0), MyStruct(0, 0, 0), MyStruct(0, 0, 0), MyStruct(131, 24, 24), MyStruct(255, 97, 239), MyStruct(131, 24, 24), MyStruct(255, 97, 239), MyStruct(131, 24, 24), MyStruct(93, 93, 93), MyStruct(131, 24, 24), MyStruct(255, 97, 239), MyStruct(255, 97, 239), MyStruct(255, 97, 239), MyStruct(255, 97, 239), MyStruct(255, 97, 239), MyStruct(131, 24, 24), MyStruct(0, 0, 0), MyStruct(0, 0, 0), MyStruct(131, 24, 24), MyStruct(255, 97, 239), MyStruct(255, 97, 239), MyStruct(255, 97, 239), MyStruct(255, 97, 239), MyStruct(255, 97, 239), MyStruct(131, 24, 24), MyStruct(131, 24, 24), MyStruct(255, 97, 239), MyStruct(255, 97, 239), MyStruct(255, 97, 239), MyStruct(255, 97, 239), MyStruct(255, 97, 239), MyStruct(131, 24, 24), MyStruct(96, 96, 96), MyStruct(96, 96, 96), MyStruct(131, 24, 24), MyStruct(255, 97, 239), MyStruct(255, 97, 239), MyStruct(255, 97, 239), MyStruct(255, 97, 239), MyStruct(255, 97, 239), MyStruct(131, 24, 24), MyStruct(0, 0, 0), MyStruct(131, 24, 24), MyStruct(254, 93, 225), MyStruct(255, 97, 239), MyStruct(255, 97, 239), MyStruct(131, 24, 24), MyStruct(0, 0, 0), MyStruct(113, 113, 113), MyStruct(113, 113, 113), MyStruct(0, 0, 0), MyStruct(131, 24, 24), MyStruct(255, 97, 239), MyStruct(255, 97, 239), MyStruct(255, 97, 239), MyStruct(131, 24, 24), MyStruct(0, 0, 0), MyStruct(93, 93, 93), MyStruct(0, 0, 0), MyStruct(131, 24, 24), MyStruct(255, 97, 239), MyStruct(131, 24, 24), MyStruct(0, 0, 0), MyStruct(104, 104, 104), MyStruct(123, 123, 123), MyStruct(123, 123, 123), MyStruct(104, 104, 104), MyStruct(0, 0, 0), MyStruct(131, 24, 24), MyStruct(255, 97, 239), MyStruct(131, 24, 24), MyStruct(0, 0, 0), MyStruct(89, 89, 89) };
Once you have the array to your image here is how its used to create an effect for the RGB Shades:
void hearts()
{
  if (effectInit == false) {
    effectInit = true;
    effectDelay = 500;
  }

  //------Generated by image-to-array--------
  CRGB hearts[80] = { CRGB(102, 102, 102), CRGB(131, 24, 24), CRGB(255, 97, 239), CRGB(131, 24, 24), CRGB(255, 97, 239), CRGB(131, 24, 24), CRGB(0, 0, 0), CRGB(0, 0, 0), CRGB(0, 0, 0), CRGB(0, 0, 0), CRGB(131, 24, 24), CRGB(255, 97, 239), CRGB(131, 24, 24), CRGB(255, 97, 239), CRGB(131, 24, 24), CRGB(93, 93, 93), CRGB(131, 24, 24), CRGB(255, 97, 239), CRGB(255, 97, 239), CRGB(255, 97, 239), CRGB(255, 97, 239), CRGB(255, 97, 239), CRGB(131, 24, 24), CRGB(0, 0, 0), CRGB(0, 0, 0), CRGB(131, 24, 24), CRGB(255, 97, 239), CRGB(255, 97, 239), CRGB(255, 97, 239), CRGB(255, 97, 239), CRGB(255, 97, 239), CRGB(131, 24, 24), CRGB(131, 24, 24), CRGB(255, 97, 239), CRGB(255, 97, 239), CRGB(255, 97, 239), CRGB(255, 97, 239), CRGB(255, 97, 239), CRGB(131, 24, 24), CRGB(96, 96, 96), CRGB(96, 96, 96), CRGB(131, 24, 24), CRGB(255, 97, 239), CRGB(255, 97, 239), CRGB(255, 97, 239), CRGB(255, 97, 239), CRGB(255, 97, 239), CRGB(131, 24, 24), CRGB(0, 0, 0), CRGB(131, 24, 24), CRGB(254, 93, 225), CRGB(255, 97, 239), CRGB(255, 97, 239), CRGB(131, 24, 24), CRGB(0, 0, 0), CRGB(113, 113, 113), CRGB(113, 113, 113), CRGB(0, 0, 0), CRGB(131, 24, 24), CRGB(255, 97, 239), CRGB(255, 97, 239), CRGB(255, 97, 239), CRGB(131, 24, 24), CRGB(0, 0, 0), CRGB(93, 93, 93), CRGB(0, 0, 0), CRGB(131, 24, 24), CRGB(255, 97, 239), CRGB(131, 24, 24), CRGB(0, 0, 0), CRGB(104, 104, 104), CRGB(123, 123, 123), CRGB(123, 123, 123), CRGB(104, 104, 104), CRGB(0, 0, 0), CRGB(131, 24, 24), CRGB(255, 97, 239), CRGB(131, 24, 24), CRGB(0, 0, 0), CRGB(89, 89, 89) };
  //-----------------------------------------

  uint8_t i = 0;
  for (byte y = 0; y < kMatrixHeight; y++)
  {
    for (byte x = 0; x < kMatrixWidth; x++)
    {
      uint8_t xy = XY(x, y);
      leds[xy] = hearts[i++];
    }
  }
}
Building Icons
ita can also be used to generate icon sets for both MacOs and Windows. You can also shortcut output filenames by only providing the extension of the files you wish to build.
$ ita -i arrows.png -o .ico -o .icns
Input Files: [arrows.png]
Wrote (ico): arrows.ico
Wrote (icns): arrows.icns
If you are feeling generous and would like to support this project
Downloads
Latest Update: November 02 2023 03:41:28 PM EDT

THE SOFTWARE IS PROVIDED "AS IS", WITHOUT WARRANTY OF ANY KIND, EXPRESS OR IMPLIED, INCLUDING BUT NOT LIMITED TO THE WARRANTIES OF MERCHANTABILITY, FITNESS FOR A PARTICULAR PURPOSE AND NONINFRINGEMENT. IN NO EVENT SHALL THE AUTHORS OR COPYRIGHT HOLDERS BE LIABLE FOR ANY CLAIM, DAMAGES OR OTHER LIABILITY, WHETHER IN AN ACTION OF CONTRACT, TORT OR OTHERWISE, ARISING FROM, OUT OF OR IN CONNECTION WITH THE SOFTWARE OR THE USE OR OTHER DEALINGS IN THE SOFTWARE.