FlipperZero SubGhz Chat Bridge
This project will allow you to communicate with FlipperZero's SubGhz chat feature using an ESP32 and a CC1101.
The chat bridge provides a web interface allowing multiple user's with different nicknames to connect and communicate with nearby flipper devices.
Special thanks to samxplogs for demonstrating this project in his video here
In order to build this you will need:
- ESP32 - https://www.amazon.com/gp/product/B09GK74F7N/
- CC1101 - https://www.amazon.com/gp/product/B01DS1WUEQ/
- Computer with Arduino 1.8.18
- ESP32 library support 2.0.5 - https://raw.githubusercontent.com/espressif/arduino-esp32/gh-pages/package_esp32_index.json
- SmartRC-CC1101-Driver-Lib - https://github.com/LSatan/SmartRC-CC1101-Driver-Lib
- Ability to upload FatFS image - https://github.com/lorol/arduino-esp32fs-plugin
- ArduinoJson 6.19.3 - https://arduinojson.org/?utm_source=meta&utm_medium=library.properties
- Adafruit_SSD1306 2.5.1 - https://github.com/adafruit/Adafruit_SSD1306
- Time Library 1.6.1 - https://github.com/PaulStoffregen/Time
- NTPClient 3.2.0 - https://github.com/arduino-libraries/NTPClient
Building your own bridge
| ESP-32 | CC1101 |
|---|---|
| 3.3v | VIN |
| GND | GND |
| 5 | CS |
| 18 | SCLK |
| 19 | MISO / SO |
| 23 | MOSI / SI |
Please note: The GDO0 and GDO2 pins are left unconnected.
Optionally you can add a screen using an SSD1306 OLED module.
https://www.amazon.com/gp/product/B0833PF7ML/
| ESP-32 | SSD1306 |
|---|---|
| 3.3v | VIN |
| GND | GND |
| GPIO21 | SDA |
| GPIO22 | SCL |
A picture of my finished device.
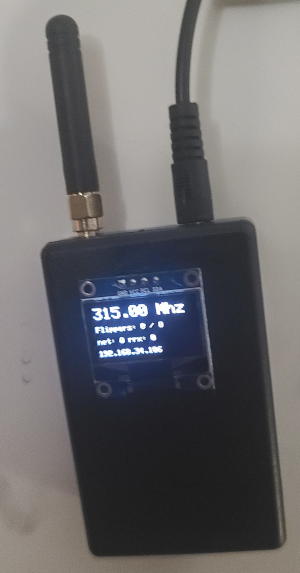
Adding the display was important for me to know when there are active flippers nearby. The display shows how many flippers are currently active and what the peak was. You can also see how many radio packets were received and how many network users are connected.
Once you've downloaded the source and properly setup your IDE for flashing:
- copy "base-settings.json" to "data/settings.json"
- edit the settings.json file in the data directory. This will be loaded at startup.
{
  "startFrequency": 433.92,
  "apMode": true,
  "captiveDNS": false,
  "hostname": "FlipperZeroChat",
  "apSSID": "FlipperChat",
  "apPassword": "changeme",
  "replayChatHistory": true,
  "Serial2Baud": 115200,
  "wifi": [
      {
        "ssid": "Your network name",
        "password": "wifi pass"
      }
  ]
}
if "apMode" is set to true the ESP32 will create a network with the settings labeled "apSSID" and "apPassword". Otherwise please add the wifi networks that should be searched for to the json array named "wifi"
The "captiveDNS" setting will redirect any DNS queries to the device's apMode IP (10.10.10.1)
Flash Settings for ESP32 (in aruino ide)
- CPU Frequency - 240Mhz
- Flash Frequency - 80Mhz
- Partition Scheme - NO OTA (2MB APP / 2MB FATFS)
- Flash Mode - DIO
- PSRAM - Disabled
- Events Run on - Core 0
- Arduino Runs on - Core 1
Now you are all set to flash the sketch and upload the FatFS image.
Using the web interface
Navigate a web browser to the ESP32's ip (output on the serial console) and you will be prompted to enter a nickname. Multiple users and computers are able to connect to the same ESP32 with distinct nicknames, they will see each others messages, as well as flipper users.
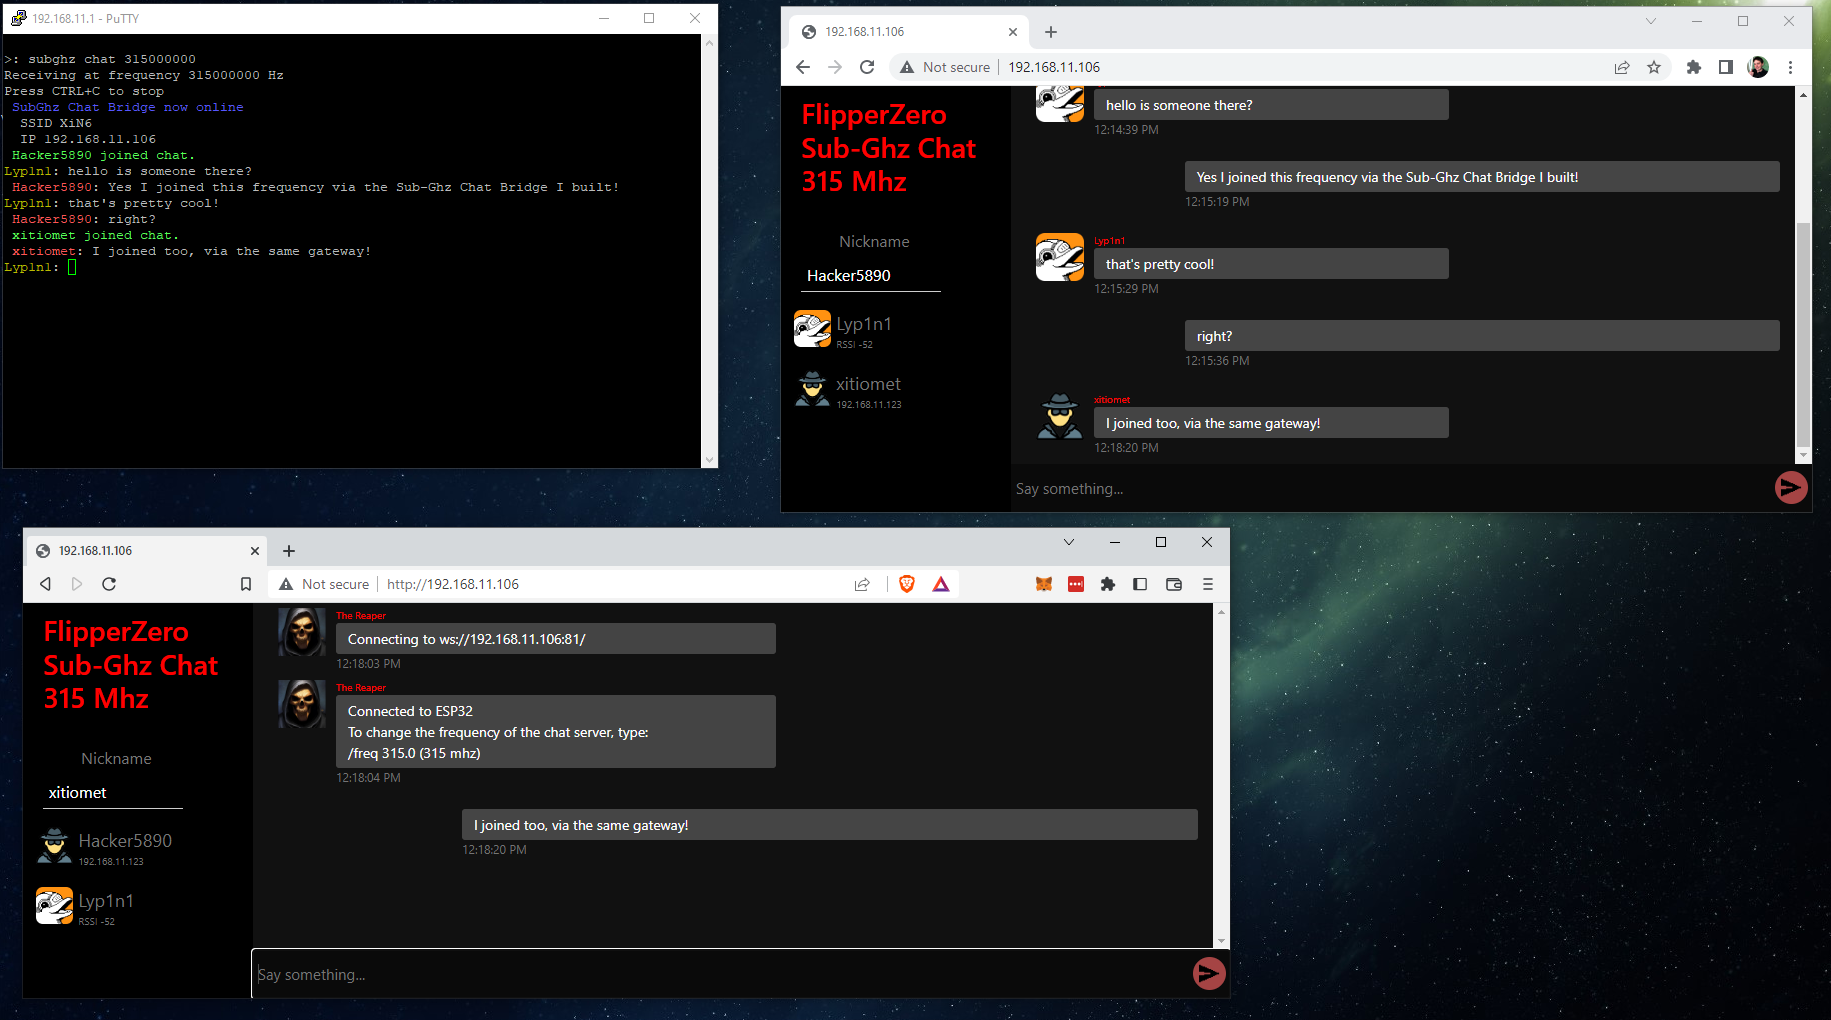
Technically you could build two bridges and they would be able to communicate with each other as well.
The catch is the CC1101 can only tune into one frequency, so everyone must be on the same frequency and if someone changes the frequency it effects all users on that bridge. You can see the current tuned frequency in the upper left hand corner.
At any point while in the chat screen a connected user may type "/freq 433.92" to change the frequency, the new frequency must be expressed in Mhz.
If the gateway starts malfunctioning any web user can type "/restart" to reboot it remotely.
Connecting with an IRC Client
So I decided to add support for IRC clients. Letting users bring their favorite chat interface to this project.
I've Tested the following clients:
once you connect simply "/join #lobby" this is the ONLY channel on this server since the other interfaces only provide one room.
Things that don't work since this isn't a real IRC server:
- private messages (except to other irc connections)
- away messages
- topic changes (topic in #lobby will reflect frequency and is controlled by @TheReaper)
- kicks/bans/ignores
- creating rooms
### Serial2 Interface
I decided i wanted a simple way to walk around NYC with this device and my phone and not worry about tethering.
It seemed worth adding one more inteface for simplicity using TX2 and RX2. This allows the device to be hooked up to
any ANSI terminal or in my case a bluetooth terminal using an HC-08 bluetooth LE module.
The interface mirrors the chat app on the flipper itself as far as coloring and formatting. However it supports a few
commands.
- /nick myNickname - set your nickname and join the chat
- /advertise - advertise the gateway over the radio
- /part - leave the chat (messages will still come in, you just cant speak until you /nick again)
- /freq 315 - change the CC1101 frequency to 315 Mhz
- /history - replay the chat history (only for the Serial2 user)
- /status - get a full status report on the device, including connected users
- /restart - restart the device
Websocket protocol
If you would like to make your own client to interface with this device the protocol is pretty simple. port 81 is a websocket server all messages are single line json objects.
Connect to ws://[deviceip]:81/
The server will immediately send a message like..
{"clientIp": "192.168.34.131", "mhz": 315, "users": [{"u": "Lyp1n1", "s": "radio", "r": -36}]}
- clientIp will be your ip as the device sees it
- mhz is the current radio frequency
- users is an array of json objects with three fields, u = username, s = source (radio/ip), r = rssi
To register a user send
{"event":"join", "username":"Hacker5091"}
there should be a response like:
{"event":"join", "username": "Hacker5091", "rssi": -63, "source": "192.168.0.131"}
To send a chat messge send
{"event":"chat", "username": "Hacker5091", "text": "This is a chat message"}
To unregister a user
{"event":"part", "username":"Hacker5091"}
To change the frequency
{"event":"frequency", "mhz": 315, "username": "Hacker5091"}
How do flipper chat messages work?
Thought i would add some details on my reverse engineering of the flipper chat protocol. After getting the radio stuff tuned just right you have a packet radio!
(legit dont have any idea why the settings that work are the correct settings, copied the parameters from the flipper source.)
Once you have your radio parameters correct, the next step is to realize that the CC1101 can only send and receieve 62 bytes at a time due to the buffer size limitations. I realized this a bit after the fact and had to incorporate buffering/chunking for long messages.
Once that is figured out we can start to think of this as a serial cable between two terminals, in fact the chat protocol uses ANSI escape codes as part of the message to show up in color on the receiving end. This made things really easy, once i knew that every message started with an escape sequency.
A typical message looks like this:
\x1B[0;33mUSERNAME\x1B[0m: Hello I'm a message\r\n
1B in hex represents the escape character (27) so any message not starting with a 27 is probably not meant for us.
I also noticed join/part messages used different color codes
\x1B[0;32mUSERNAME joined the chat.\x1B[0m\r\n
\x1B[0;31mUSERNAME left the chat.\x1B[0m\r\n
using the color codes supplied by the flipper Chat(33 amber), join(32 green), leave(31 red) its not hard to tell the message types apart.
This led me to some curiosity if the flipper cared about the color codes or not, turns out it doesn't any text will just be displayed on the receiving end!
I decided that the bridge would use different color codes for it's users allowing both the flipper users and web users to tell each other apart
I went with chat(91 bright red), join(92 bright green) and leave(90 Grey)
Now the gateway can select proper avatars for flippers and other gateways.
THE SOFTWARE IS PROVIDED "AS IS", WITHOUT WARRANTY OF ANY KIND, EXPRESS OR IMPLIED, INCLUDING BUT NOT LIMITED TO THE WARRANTIES OF MERCHANTABILITY, FITNESS FOR A PARTICULAR PURPOSE AND NONINFRINGEMENT. IN NO EVENT SHALL THE AUTHORS OR COPYRIGHT HOLDERS BE LIABLE FOR ANY CLAIM, DAMAGES OR OTHER LIABILITY, WHETHER IN AN ACTION OF CONTRACT, TORT OR OTHERWISE, ARISING FROM, OUT OF OR IN CONNECTION WITH THE SOFTWARE OR THE USE OR OTHER DEALINGS IN THE SOFTWARE.